Growing cannabis for the first time
How to Grow Cannabis for the First Time
A Quick Beginner’s Guide
Growing cannabis for the first time can seem like a daunting task, but with the right knowledge, tools, and techniques, anyone can cultivate a successful and healthy plant. Whether you are growing for personal use or to experiment with the plant’s cultivation, this beginner’s guide will walk you through the basics of how to get started.
1. Understand Your Local Laws
Before you begin, it’s essential to familiarize yourself with the local regulations regarding cannabis cultivation. Growing cannabis is legal in some areas, but there are often restrictions on the number of plants, the location (indoor or outdoor), and the use of the plant (recreational or medical). Make sure to adhere to these laws to avoid legal complications.
2. Choose Your Growing Medium
Cannabis can be grown in various mediums, including soil, coco coir, or hydroponics. For beginners, soil is often the most forgiving and easy to manage. A high-quality organic soil mix is ideal as it provides the necessary nutrients for your cannabis plants to thrive. If you’re using a non-organic soil, consider adding nutrients manually.
- Soil: Traditional and natural, great for beginners.
- Coco Coir: A soilless medium made from coconut fibres, good for those seeking faster growth and better control over nutrients.
- Hydroponics: Growing plants without soil using a water-based solution rich in nutrients, suitable for advanced growers.
3. Choose Your Cannabis Seeds or Clones
Selecting the right cannabis strain is crucial for a successful grow. Seeds come in two main varieties: indica (known for their relaxing effects) and sativa (known for their energizing effects). There are also hybrids that blend characteristics from both. You can also choose feminized seeds (which are bred to produce only female plants) or auto-flowering seeds (which automatically flower after a set amount of time).
If you’re not starting from seeds, you may opt for clones, which are cuttings from mature plants. Clones can be a bit more challenging for beginners, but they ensure you have a female plant, which is what you want for bud production.
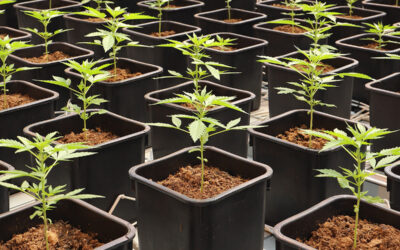
4. Set Up Your Grow Space
Cannabis can be grown indoors or outdoors, depending on your climate and available space. Indoor growing offers more control over the environment, while outdoor growing relies on natural sunlight and weather conditions.
Indoor Growing:
- Grow Tent: Provides a controlled environment with reflective walls to maximize light exposure.
- Lights: LED grow lights are energy-efficient and highly effective, but you can also use fluorescent or HID (high-intensity discharge) lights.
- Ventilation: Air circulation is crucial to prevent mould and ensure healthy growth. Install fans and carbon filters to manage airflow and odour.
- Temperature and Humidity: Cannabis plants thrive in temperatures between 70-85°F (20-30°C) during the day and slightly cooler at night. Humidity levels should be around 40-60%, depending on the plant’s stage of growth.
Outdoor Growing:
- Location: Choose a spot that gets at least 5-6 hours of direct sunlight each day.
- Soil: If growing in the ground, ensure the soil is nutrient-rich and well-draining.
- Protection: Consider fencing or netting to protect your plants from animals and pests.
5. Watering and Nutrients
Water is essential for your plants, but overwatering can cause root rot and other problems. Water your cannabis plants when the top inch of soil feels dry. It’s also important to pH your water to ensure it’s within the optimal range of 6.0-7.0 for soil-based growing (5.5-6.5 for hydroponics).
Cannabis plants require three primary nutrients: nitrogen (N), phosphorus (P), and potassium (K), often referred to as N-P-K. You can buy pre-mixed nutrient solutions designed for each stage of the plant’s growth (vegetative and flowering phases).
- Vegetative Stage: Higher in nitrogen to promote leafy growth.
- Flowering Stage: Higher in phosphorus and potassium to promote bud development.
6. Understanding the Cannabis Growth Stages
Cannabis plants go through several growth stages, and understanding these will help you provide the right care at the right time.
- Germination: This is when your seed sprouts. You’ll want to keep the environment warm and moist, using techniques like the paper towel method or planting directly in the soil.
- Vegetative Stage: During this phase, the plant focuses on growing leaves and stems. It requires more light (18-24 hours of light per day) and nutrients high in nitrogen.
- Flowering Stage: This is when your plant starts to produce buds. Reduce light exposure to 12 hours of light and 12 hours of darkness per day to trigger flowering. Nutrient solutions should now contain more phosphorus and potassium.
7. Pest and Disease Control
Cannabis plants are susceptible to pests like spider mites, aphids, and caterpillars, as well as fungal infections like powdery mildew. Regular inspection of your plants can help catch problems early. Natural solutions like neem oil, insecticidal soaps, and predatory insects (like ladybugs) can help manage pests without using harmful chemicals.
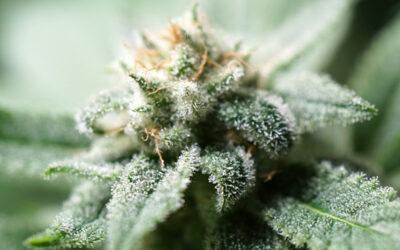
8. Harvesting
After 8-12 weeks in the flowering stage (depending on the strain), your cannabis plants will be ready for harvest. You’ll know it’s time when the pistils (the hair-like structures on the buds) turn brown, and the trichomes (the tiny, sticky crystals) turn milky white or amber.
To harvest, cut down the branches, trim off excess leaves, and hang the plants upside down in a cool, dark space to dry for about 7-10 days.
9. Curing Your Buds
Curing is the final step and is essential for improving the flavour, potency, and smoothness of your cannabis. After drying, place your buds in airtight glass jars, opening them once a day for the first week to release moisture. Cure for 2-4 weeks for the best results.
10. Final Thoughts
Growing cannabis for the first time is a rewarding process, but it requires patience, attention to detail, and a willingness to learn. Start with a small grow, take note of what works and what doesn’t, and gradually refine your process. With time and practice, you’ll be able to grow healthy, potent cannabis plants from seed to harvest.
Good luck, and happy growing!
Common Growing Mistakes
Common Cannabis Growing Mistakes Cannabis cultivation is now more accessible than ever, with many...
Choosing The Right Medium
Choosing The Right Medium For Growing Cannabis Soil vs. Hydroponics vs. Coco Coir When it comes to...

Auto-flowering vs Photoperiod
Auto-flowering vs Photoperiod Growing cannabis has evolved into an art and science, with various...
Germinating Cannabis Seeds
Germinating Cannabis Seeds Three Proven Methods Germinating cannabis seeds is the first critical...
Growing Medical Cannabis
Growing Medical Cannabis As cannabis continues to gain legal status for medicinal purposes...
Cannabis Concentrates
Cannabis Concentrates Cannabis concentrates are quickly becoming one of the most popular methods...
Scrog Growing
Scrog Growing: A Beginners Guide What is Scrog (Screen of Green)? Scrog, or "Screen of Green," is...
Indica Versus Sativa
Indica vs. Sativa Understanding the Key Differences When it comes to cannabis, understanding the...
Drying And Curing Cannabis
Drying And Curing CannabisAfter months of hard work, your plants are ready to harvest, marking the...
When To Harvest Your Cannabis Plants
When to Harvest Your Cannabis Plants A Comprehensive Guide for New Growers One of the most...